|
 |
|
|
 |
 |
|
Please note:
We are banding the coat before it is cut, because
the hair switches
are being saved for a well known soft sculpture artist to use in her
canine art. |
|
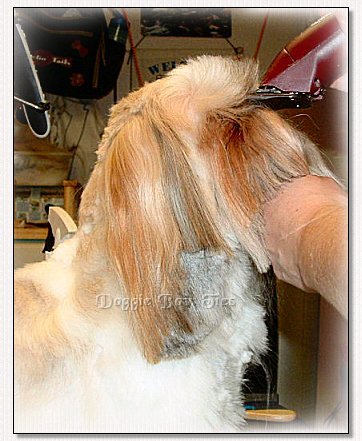
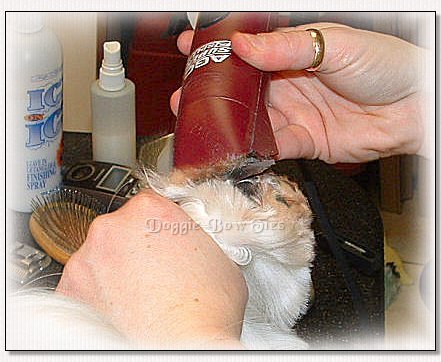
1.) Head: We will be using this process
of banding sections and cutting to get the hair at a
manageable length for the electric clippers. Section out the topknot
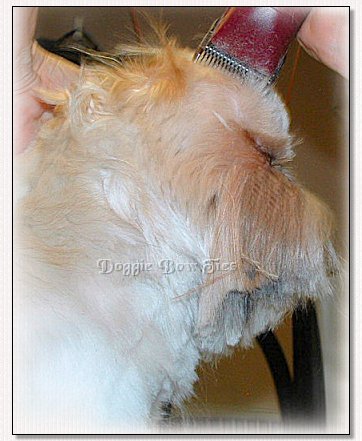
and band it. Cut below the band. |
|
|
2.) Head: This leaves a little "crew cut"
of hair about
1" long on top of the head. We will use the clippers on this hair later. |
|
|
 |
 |
|
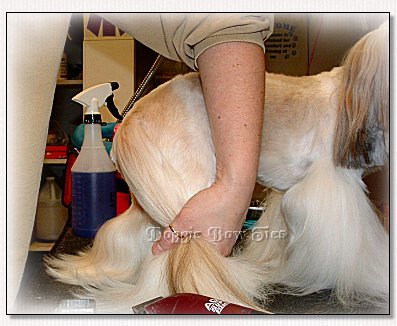
3.) Body:
Banding the body hair along the parted
backside...note the ear is held out of this banding.
It will be cut later with the face.
|
|
4.) Body:
Continue banding sections of
the body hair and cutting
below the band leaving
about 1" of hair. Banding before cutting also helps to define the
exact areas that will be shaved. |
|
|
 |
 |
|
5.) Face: Parting down from the corner of
the eye straight down and back to the front of the
ear will be banded for cutting.
This section
is the hair that is being pulled back |
|
|
6.) Neck: Cutting off the banded sections,
the ear is also banded and pulled away to expose the
neck area which will be cut. |
|
|
 |
 |
|
7.) Body: One side is completely
cut, and the second side is
banded for cutting. Note that the
ear fringe is pulled
back to the other side
so it will
not be cut. We are cutting off the length of the
body coat. |
|
|
8.) Rear:
The rear section under the tail
and to the hocks
of each leg is sectioned and banded to be cut. We will
go back over
this area
later with
clippers. Do not band
the leg hair~ it is left long. |
|
|
 |
 |
|
9.) Face: The section shown is the under
eye and
muzzle hair that
will be cut LATER. |
|
| 10.) Upper Chest:
Under the neck and upper
chest is banded for cutting.
Again, the leg hair is
not being cut, only the body hair above and
the
chest hair under the neck is banded and cut. |
|
|
 |
 |
|
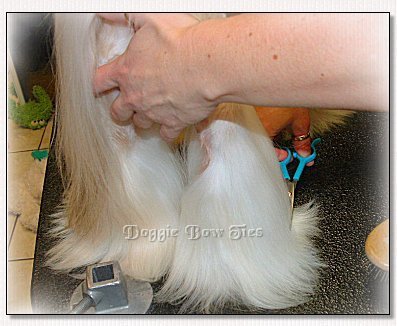
11.) Chest:
Showing the neck and upper
chest section
banded for cutting. |
|
|
12.) Chest: After cutting the neck and
upper chest section.The legs are left long. The ears and facial hair are
pulled up here to show the scissored front. |
|
|
 |
 |
|
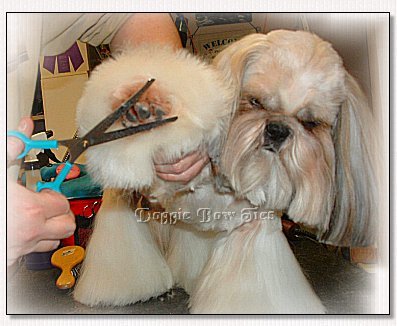
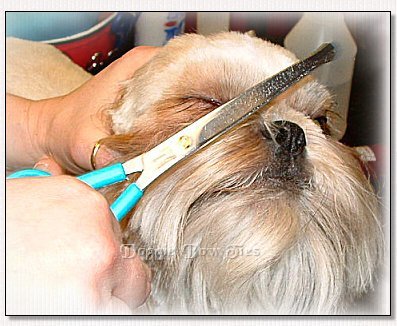
13.) Face:
Ears, moustache, and beard
are held together
for initial cut. |
|
|
14.) Face: Cutting straight across
through all thickness... |
|
|
 |
 |
|
15.) Scissor work is complete
for now, and
it is time to use the clippers... |
|
|
16.) Face:
Using a #7 Blade
the clip begins between
the eyes and up over the forehead. |
|
|
 |
 |
|
17.) Face:
Holding the ear fringe back
and clipping the face sides. |
|
|
18.) Neck:
Holding the ear fringe up and
clipping the sides of the neck. |
|
|
 |
 |
|
19.) Neck:
Clipping the back of the
neck... |
|
|
20.) Back:
Continue clipping with your
#7 Blade
down the back and body. |
|
|
 |
 |
|
21.) Body:
Clipping the body with the
#7 Blade.
which will leave the coat roughly 1/8"
long. |
|
|
22.) Neck:
Clipping the neck, ear fringe
pulled to the side. |
|
|
 |
 |
|
23.) Body:
Clipping the back up to the
beginning
of the rear leg which is left long. |
|
|
24.) Rear:
The rear section under the
tail and to the hocks
of each leg is clipped with the #7 Blade. |
|
|
 |
 |
|
25.) Tummy:
Cleaning up the tummy area
with the #7 Blade. |
|
|
26.) Body: Finished body clip...on to
the armpits... |
|
|
 |
 |
|
27.) Armpits:
Change your blade size to a
#10 Blade for the
armpits and groin. Clipping the left armpit. |
|
|
28.) Armpits:
Clipping the right armpit
still using the #10 Blade
for a closer cut than on the body. |
|
|
 |
 |
|
29.) Grab all of the hair on the
tail and rear leg to lift the leg. |
|
|
30.) Groin:
Clipping the groin area using
a #10 Blade. |
|
|
 |
 |
| 31.) Feet:
Trimming the rear feet level
with the table rounding them. |
|
|
32.) Feet:
Showing the rounded cut of
the rear feet. |
|
|
 |
 |
|
33.) Feet:
Trimming the front feet
rounding them
by cutting the outside hair. |
|
|
34.) Feet:
One foot left to go... |
|
|
 |
 |
|
35.) Feet:
All the feet have been
trimmed rounding them
where they meet the table. |
|
| 36.) Feet:
Grabbing all of the hair on
the leg at the hocks and brushing the hair down to
show the straggly hairs that must be cut off. |
|
|
 |
 |
37.) Feet:
Using your scissors carefully
cut the hair flush
with the bottom of the foot. |
|
|
38.) Feet:
Close up of trimming the
inside hair level
with the bottom of the foot. |
|
|
 |
 |
|
39.) Feet:
Trimming the front inside paw
hair level with the foot. |
|
|
40.) Pads:
Clip the pads of the feet
with a #40 Blade. |
|
|
 |
 |
| 41.) Pads:
Clip the pads of the feet
with a #40 Blade. |
|
|
42.) Feet:
The foot pad should be well
trimmed like this. |
|
|
 |
 |
|
43.) Face:
Comb the hair on top of the
nose straight up, and then trim the nose hair at an
angle on either side of the nose. |
|
|
44.) Face:
The ears are gathered together to
hold the head steady. Slowly scissor the beard and
moustache into a semi rounded shape with the sides
being shorter. |
|
|
 |
 |
|
45.) Face:
Still holding the ears back
to steady the head and expose the muzzle and beard,
angle the scissors up
to cut at a angle for a rounded face.
|
|
| 46.) Face:
Still touching up the cuts and
rounding out the beard. |
|
|
 |
 |
|
47.) Lifting the head a bit, you
can see the pieces of hair that need more trimming on the ears and under the chin. |
|
48.) Ears: Cutting the ear fringe with
rounded scissors.
They will be short. |
|
|
 |
 |
|
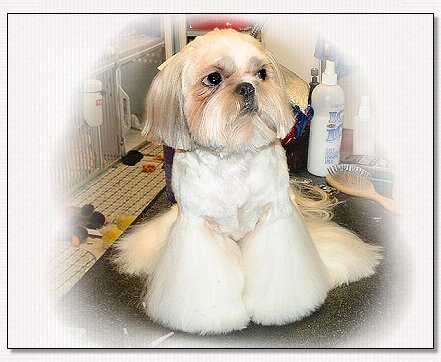
49.) Finished:
Front view |
|
|